Cantina Field Guide

Onboarding for the Cantina project delivery team

Welcome to Cantina! Let’s get you familiarized with how we do things here. Cantina is the kind of place that promotes independent thinking. We’re not here to tell you how to do your job, but we’ve spent quite a bit of collective time learning a thing or two about digital projects. This Field Guide is a collection of those lessons and recommendations.

This is meant to be a resource more than a narrative. Keep it bookmarked for when you run into something unfamiliar. Should you run into something that we haven’t covered, it’s probably a good idea to contribute to the guide yourself.

As we grow, change, and learn, so does our thinking. This is a living document to express our current practices. It improves over time. Just like Bill Murray.

The Guide

Contributing

The Field Guide is a living document, and it should grow and change. We encourage all Cantina members to contribute to the Field Guide to incorporate their own experience and expertise.

Guiding Principles

If you’re planning on writing for the Field Guide, please keep the following in mind:

  • The primary target audience is new hires. Make it understandable for people who may be new to the Cantina team and unfamiliar with how we operate. Think of it like writing to your past self about the things you’ve learned since coming to Cantina.
  • The focus is on how we deliver projects. The Field Guide is a great spot to include details on how we approach design, development, and project management. However, it’s not the venue for most internal company policies.
  • Keep it high level. Try to answer ​why​ and ​how​ we do things, without getting too in the weeds on things like ​what tools​ we should be using. This is meant to detail our principles and practices, but not be so prescriptive as to suggest that every project will be the same.
  • Stick to practices that are applicable across projects. The goal is to include the approaches that are common amongst many of our projects. If something was done only once on a project, it may not be relevant enough to incorporate in the Field Guide.

Adding New Topics

Is there is a relevant topic that you think is missing from the Field Guide, feel free to either run it by the team or go straight to adding it to the Guide.

  1. Add an Issue on GitHub
  2. Assign the Issue to yourself
  3. Make your changes (see below)

Editing Existing Topics

If you see that a topic is out of date or is erroneous, go ahead and submit your changes.

  1. Add an Issue on GitHub detailing the need for the change
  2. Assign the Issue to yourself
  3. Make your changes (see below)

Help with Current Issues

You can find the task list for the project under the GitHub Issues tab. Check there for a topic you’d feel comfortable contributing to.

  1. Find an Issue on GitHub
  2. Assign the Issue to yourself
  3. Make your changes (see below)

Making Changes

  1. Create a new branch from master (named feature/*** or bug/***)
  2. Commit changes to your branch
  3. Make a Pull Request for your branch
  4. Include a callout to the relevant issue in the Pull Request description
  5. Wait for feedback from other team members
  6. Once you’ve received the “LGTM” from others, merge your PR into master

Design

Experience Design Process

The goal of this document is to capture the XD process at a high-level. There are innumerable possible variables that will inform how it’s applied to each project. This document therefore focuses on acting as a general guideline rather than a step by step instruction manual. Much of this comes from Jeff Gothelf’s Lean UX, which should be required reading for everyone in the company in order to ensure comprehensive alignment on how we do what we do.

At it’s core, the Design phase (as opposed to the Development phase) should employ the following iterative cycle:

IMAGE

Fundamentally, this builds on Lean:

IMAGE

Rationale for the XD Process

The XD process is inextricably linked to the Sales process in that the learning starts virtually as soon as contact with the prospective client is made. To that end, the XD process outlined here reaches upstream into the pre-sales phase. An assumption has been made that our process is based on variable scope, non-waterfall projects. As an organization we should build our practice around a core Agile design model for efficiency and routinization sake. Historically we’ve struggled to adhere to a process with rigor, in part because we’ve tried to have a process that’s infinitely flexible and therefore difficult to define. This process proposes that estimates are based on resources and time and not on fixed scope – admittedly a challenge, but one worth considering given the historical difficulty with scoped estimates.

The Process

  1. Understand the Domain and Define Outcomes (Sales, Services)
    1. Listen to the client to learn about their challenges, their customer challenges, the opportunity space, the competitive space and the maturity of the idea, organization and exposure to software design process.
    2. Frame the discussion with assumptions, not requirements.
      1. “[Our service/ product] was designed to achieve [these goals]. We have observed that the product/ service isn’t meeting [these goals], which is causing [this adverse effect] to our business. How might we improve [service/ product] so that our customers are more successful based on [these measurable criteria]?
    3. Prioritize assumptions, based on level of risk and number of unknowns. Focus on high risk/high unknowns.
    4. Convert assumptions to testable hypotheses. Look for benchmarks to measure against.
      1. We believe that [doing this/ building this feature/ creating this experience] for [these people/ personas] will achieve [this outcome]. We will know this is true when we see [this market feedback, quantitative measure, or qualitative insight].
  2. Define a Project Approach (Sales, XD, ENG)
    1. Work together with the client to design the project/proposal/SOW collaboratively. Start off with transparency and shared understanding. Build trust and share our thinking from the start. Eliminate the “over-the-wall” approach to proposal creation, where we scramble in hopes that we got it right. Pair with a standard engagement model document that explains how we work and our standard terms.
    2. Determine the minimum set of artifacts required to prove/disprove the hypotheses
    3. Identify the tools and techniques the team will employ to create the artifacts
    4. Set reasonable timeframes and resources required to reach outcomes.
  3. Design Potential Solutions (Services)
    1. Customer and client interviews
    2. Collaborative, iterative, atomic design
    3. Focus on low fidelity sketches and wireframes
    4. Define aesthetics and style (style guides, tiles, mock-ups, a/b preferences exercise)
  4. Build Minimally Viable Prototypes (Services)
    1. Build prototypes (low to high fidelity)
    2. Non-prototypes (email, ad words, landing pages, surveys, button to nowhere, wizard of oz)
  5. Test and Refine (Services)
    1. Regularly and repeatedly scheduled as part of every sprint - not saved for a future phase
    2. GOOB - Get out of the Building. Get actual customer feedback.
    3. Full team participation (not siloed)
  6. Build and Deliver the Project (Services)
    1. Job stories
    2. Agile development
    3. Performance testing
  7. Learn from the Project (Sales, Services)
    1. Measure outcomes
    2. Review analytics
    3. After action reviews

Methodologies:

  • Lean UX
  • Jobs to be Done
  • Possible: Design Thinking

Principles and Tenets:

  • Progress is based on outcomes, not outputs
  • Focus on problems, not features
  • Focus on jobs not users. Situations, motivations, forces (context), and desired outcomes. (Job stories not user stories).
  • Iteration and validation - embrace experimentation and measurement
  • No more BDUF (Big Design Upfront)
  • All artifacts and deliverables delivered in the solution medium (i.e. the browser)
  • Everyone designs.
  • Small, cross-functional, dedicated teams = shared understanding
  • Rapid prototyping (& true MVPs)
  • “Customers” or “People”, not “users”
  • Permission to fail
  • Direct involvement with and access to customers. No more clients-as-proxy.
  • Artifacts are not deliverables
  • Artifacts are disposable
  • Remove waste wherever possible
  • Client collaboration over contract negotiation
  • Responding to change over following a plan
  • No heros, rockstars or ninjas

Tools & Techniques:

  • Lean Canvas
  • Business Assumptions exercise
  • Design Studio/Charette/Sprint
  • Style Tiles
  • Style Guides
  • Prototypes
  • Wireframes
  • Mock-ups

Design Sprints

The Design Sprint is a 5-phase exercise to solve product design problems. Cantina team members work hand-in-hand with client teams in a series of workshops. Participants come together to create a shared understanding, explore and identify potential solutions. The solutions are prototyped and tested with users.

The Design Sprint is an effective method of quickly reducing risk when creating and improving products. Cantina often employs 2-week Design Sprints to kick off new engagements.

When to Run a Design Sprint

You may want to run a Design Sprint if you are…

  • Creating a new business or product
  • Expanding to new customer segments
  • Adding or improving feature to an existing product
  • Redesigning a workflow within an existing product
  • Looking for discreet ways to move the needle on an existing product

Steps

Prepare

  • Research
  • Plan
  • Materials

1. Understand

  • Develop shared understanding of the problem, business, customers, and goals
  • Identify and prioritize assumptions and questions
  • Create evaluation criteria
  • Narrow the scope of the sprint

2. Diverge

  • Generate potential solutions for the problem
  • Exploration exercises

3. Converge

  • Organize and evaluate ideas from diverge phase
  • Select most promising solutions

4. Prototype

  • Build testable prototypes

5. Test

  • Test the prototypes with customers
  • Interview customers
  • Observe and record customer interactions and feedback

Deliver Results

  • Analyze customer feedback
  • Validate initial assumptions and answer initial questions
  • Identify new questions, assumptions, and opportunities for research
  • Present findings

Further Reading

Style Guides

Every project needs a style guide

With our iterative work nature, style guides help keep the UI consistent throughout an application. A style guide contains examples of all elements, and their respective states. It should have clearly written code, with necessary comments for a new developer entering the team to become caught up.

The style guide should use the application’s generated CSS to stay up to date. If new elements and components are created, they should be documented in the style guide.

Benefits

  • Keep UI consistent
  • Keep the UI DRY
  • Helpful when working with large teams
  • Helpful when building new features frequently
  • Share patterns
  • Help future teammates
  • Excellent deliverable

Style Guide Libraries

UI Testing

When building component based applications, changes can have global effects. To ensure these changes don’t break the UI of components we can use automated UI testing tools. This helps discovery of any issues to be quicker and easier.

After creating the initial component, you can setup the testing tool to automatically take screenshots of the component during each build. If a new screenshot looks different than the previous, you’ll get an alert and can fix or ignore the warning. This is very beneficial when used with the style guide. In particular, when you update the style guide, the UI test will tell you whether or not you’ve unintentionally impacted any parts of your sites, and allows you to adjust accordingly.

Benefits

  • Easily test visual changes
  • Screenshot components through the entire application
  • Ensure component is being used properly

UI Testing tools

User Research

User Research is an intentionally broad way to define the various forms of getting input from users. It takes many different forms throughout a UX project including early investigations (e.g. interviews) and final testing (e.g. usability testing).

Many of our projects include user research in one form or other. Some start with interviews to help understand the contexts, problems, and needs of the users. Some involve running usability tests to verify our success in accomplishing the project goals. Many projects incorporate multiple rounds of feedback throughout the project to ensure that the solutions we are providing are as effective as they can be.

When do I need it?

User research represents the “user” in “user experience,” and, as such, sits at the center of a UX toolkit. You’ll need to perform user research when you are looking to answer questions and get feedback from the audience who will end up using the product.

Some types of questions you can expect to answer include:

  • Who is our audience?
  • What problems do they have?
  • What/How might this problem be solved?
  • Is our solution getting close to viable?
  • What is causing this usage trend?

When don’t I need it?

More often than not, user research will decrease the time it takes to create a viable solution to a problem. However, not all Cantina projects require UX involvement. You may not see user research incorporated into a project if…

  • The client is leveraging their own design or product team
  • The project is primarily engineering-focused and has little or no end-user component

Quick Guide

First off, the type of research you are looking to do is based on the types of questions you are asking:

  • Generative Research - “What’s up with …?”
    • Leads to ideas that help identify the problem
    • Often includes interviews, observations
  • Descriptive Research - “What and how?”
    • Already have problem statement
    • Understand context and audience, ensuring you’re not designing for yourself
    • Often includes interviews, observations
  • Evaluative Research - “Are we getting close?”
    • After you’ve identified potential solutions
    • Test the solutions against an audience
    • Often includes usability testing
    • Ongoing and iterative
  • Analytic Research - “Why is this happening?”
    • After implementation
    • Ongoing

The full process looks something like this:

  1. Define the problem
  2. Select the approach
  3. Plan and prepare
  4. Collect the data
  5. Analyze the data
  6. Report the results

Common Objections

  • We don’t have time or budget
    • You run the risk of taking the wrong direction from the start. You must validate your assumptions one way or another.
  • We understand the problem already
    • It won’t hurt to validate your understanding. Research serves as a great leg to stand on with design decisions. Plus, it helps create a shared understanding between designers and domain experts.

Pro Tips

  • Watch out for bias. Confirmation bias, sampling bias, sponsor bias, and more. Apply rigor to your research, take the inevitable bias into account, and don’t be afraid to have your hypotheses proven wrong.
  • Be prepared. Develop your script, build your supporting materials, and prepare your means of recording ahead of time.
  • Take notes. You should have a dedicated person as a recorder in any interviews.
  • Shut up and listen. You just might learn something.

Methods

Information Architecture

When we’re working on the the information architecture of a project, we typically use two methods: Card Sorting and Tree Jack

Card Sorting

We typically use card sorting in person or during workshops for large content project, so we can understand the structure and navigation. We’ll take the results from card sorting and use Tree Jack to test our hypotheses.

Tree Jack

Is typically done online and unmoderated. We’ll create test for users that are goal focused activities to test the current and/or new IA. While the tester tries to accomplish a specific goal, all of their data is recorded and kept for review. We use the analysis of these test to help update the IA and will test again if needed. Our clients may have input on the IA, but it is user and goal driven.

Usability Testing

When doing usability testing, a minimum of 2 Cantina employees are required. One person should lead the user through the process, ask questions, give goals and have interaction with the user. The second person should be the note taker; recording all verbal and nonverbal actions of the user. These notes are very important, as they’ll be used in conjunction with any video recordings during review.

A user should be given a series of goals, that have been established and recorded prior to the test. At a minimum, we should record the screen the user is using (desktop and mobile), and should try to record the user as well (to help record non-verbal communication). Ideally, testing is done face to face in context of where they would be using the application, but if that is not possible, a screen sharing application (Citrix, GoToMeeting, etc) can be used instead.

How to find users

Typically, the client will find users for testing. These users can be internal or customers, depending on the needs of the project and testing. If the client can’t find users, we can use an online service to with users virtually.

Examples & Case Studies

Further Reading

Accessibility

Our applications should be designed and built so they are accessible by everyone. We want to promote an inclusive environment, so folks with disabilities aren’t blocked from using our work.

Chrome and Firefox have various plugins which will help perform accessibility audits on our applications.

Accessibility Checklist

These are to be used during development, QA, and product review.

Quick Tips and Tricks

  • Use HTML for information and structure.
  • Use CSS for presentation.
  • Use semantic markup
  • Add ARIA attributes to HTML elements to assist screenreaders
  • All id attributes on a single page must be unique to that page.
  • Provide additional text to describe a link with the title attribute.
  • Use links
  • Use breadcrumbs to improve navigation.
  • Use the nav element to group related links.
  • Use color contrast analyzer to find contrast issues
  • Use SVGs for icons, stay away from using font icon families
  • Use standard controls for forms
  • Don’t block keyboard controls
  • Use redundant keyboard and mouse event handlers.
  • Don’t identify content by its shape or location (i.e. “Press the button to the left” = bad)
  • If the web page does not conform to accessibility standards, there should be a link to a page that has the same content and does conform to accessibility standards.

Content

  • The first link on the page is a “skip to main content” link.
  • Content is ordered in a meaningful sequence.
  • Verify that link text describes the purpose of the link
  • Use percentages or ems for font sizes so that user agents can scale text appropriately.
  • All headings should be marked a such semantically (using tags).
  • Use the abbr tag to provide the full text on abbreviations.
  • Use relative widths to try and keep lines of text to 80 characters or less.
  • Do not justify text. If you must, then you should also provide a mechanism to disable the justification.
  • Use named font sizes to express the relative font size where applicable (xx-small, x-small, small, medium, large, x-large, xx-large, smaller, or larger).
  • When dynamically inserting content into the DOM, inject it immediately after the trigger element. Also, dynamically inserted content should be in a logical order.

Layout

  • Use CSS margin and padding instead of spacer elements.
  • Do not use white space for visual formatting.
  • Use semantic markup (choose elements based on their meaning rather than for visual purposes).

Images

  • Use alt text with images.
  • Use CSS background images for purely decorative images. Include meaningful images with the img tag and provide alt text.
  • Combine adjacent image and text links for the same resource (i.e. put the image tag inside the anchor tag)
  • If you want assistive technology to ignore an image, do not provide the title attribute and set the alt attribute = “” (null)

Interaction

  • Color is not used alone to convey meaning. It is accompanied with text.
  • Header text describes the content that follows.
  • UI components have a visual indicator for when they receive focus.
  • Form controls have descriptive labels (or a title if no label is available).
  • When a form submission is successful, the application displays a success message.
  • When there is an error on form submission, the application displays an error message with a link to that form control.
  • When a form control causes a change of context, the application describes what is going to happen before the change occurs.
  • There are no time limits on user activity.

Focus

  • Use the native focus indicator.

Keyboard Actions

  • All functionality must be accessible via keyboard.
  • There is a logical tab order through links, form controls, and objects.

Tables

  • Avoid using layout tables if possible.
  • When providing a title for a table, use the caption element.
  • Use the scope attribute to associate header cells and data cells in data tables.
  • Use the id attribute to identify table headers. Use the headers attribute to link table cells with the appropriate header.

Forms

  • Save user data so that it is available after the user signs back in (i.e. if their session times out, the data is not lost)
  • Form controls must have a label or a title attribute (preferably a label)
  • Labels should have a for attribute that matches its respective form input

Firefox Audit Tools

  • The WCAG Contrast Checker passes with at least Level AA.
  • There are no accessibility errors with the WAVE Toolbar.

Learn more

Plugins/tools

Development

Development Process

Why do we use a process?

A process…

  • Puts everyone on the same page about how to proceed during a project
  • Ensures everyone knows their roles and responsibilities
  • Helps with onboarding of new employees
  • Allows us to test and refine how we do things scientifically over time
  • Increases efficiency

Every business, from restaurants to shipping companies, needs processes to keep things running smoothly, and software consulting companies are no exception. Having a well-defined process is not only important in delivering products efficiently, but also as a part of the sales process. Clients often ask about our process, and being able to talk about it in detail shows we have thought it through and know how to deliver products effectively.

The Cantina Process

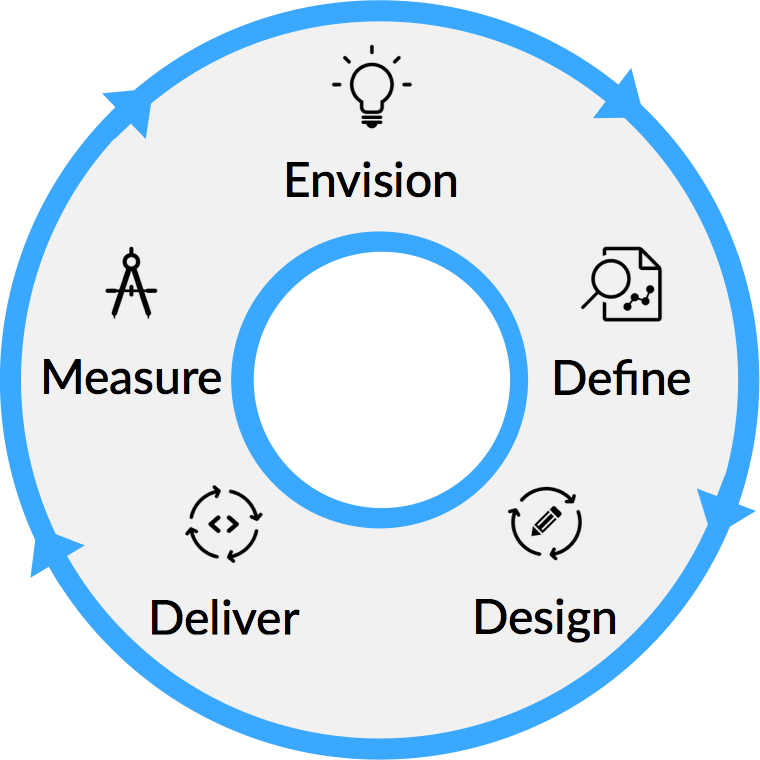
The process that Cantina advertises on our website has the following steps:

Cantina Process

This is a good description of the coarse phases of our overall process. However when we look at actually building the software using an agile methodology, we need to think in terms of iterations. It turns out that these steps also translate quite nicely into iterations if we think about the process as a continuous cycle:

Cantina Process Cycle

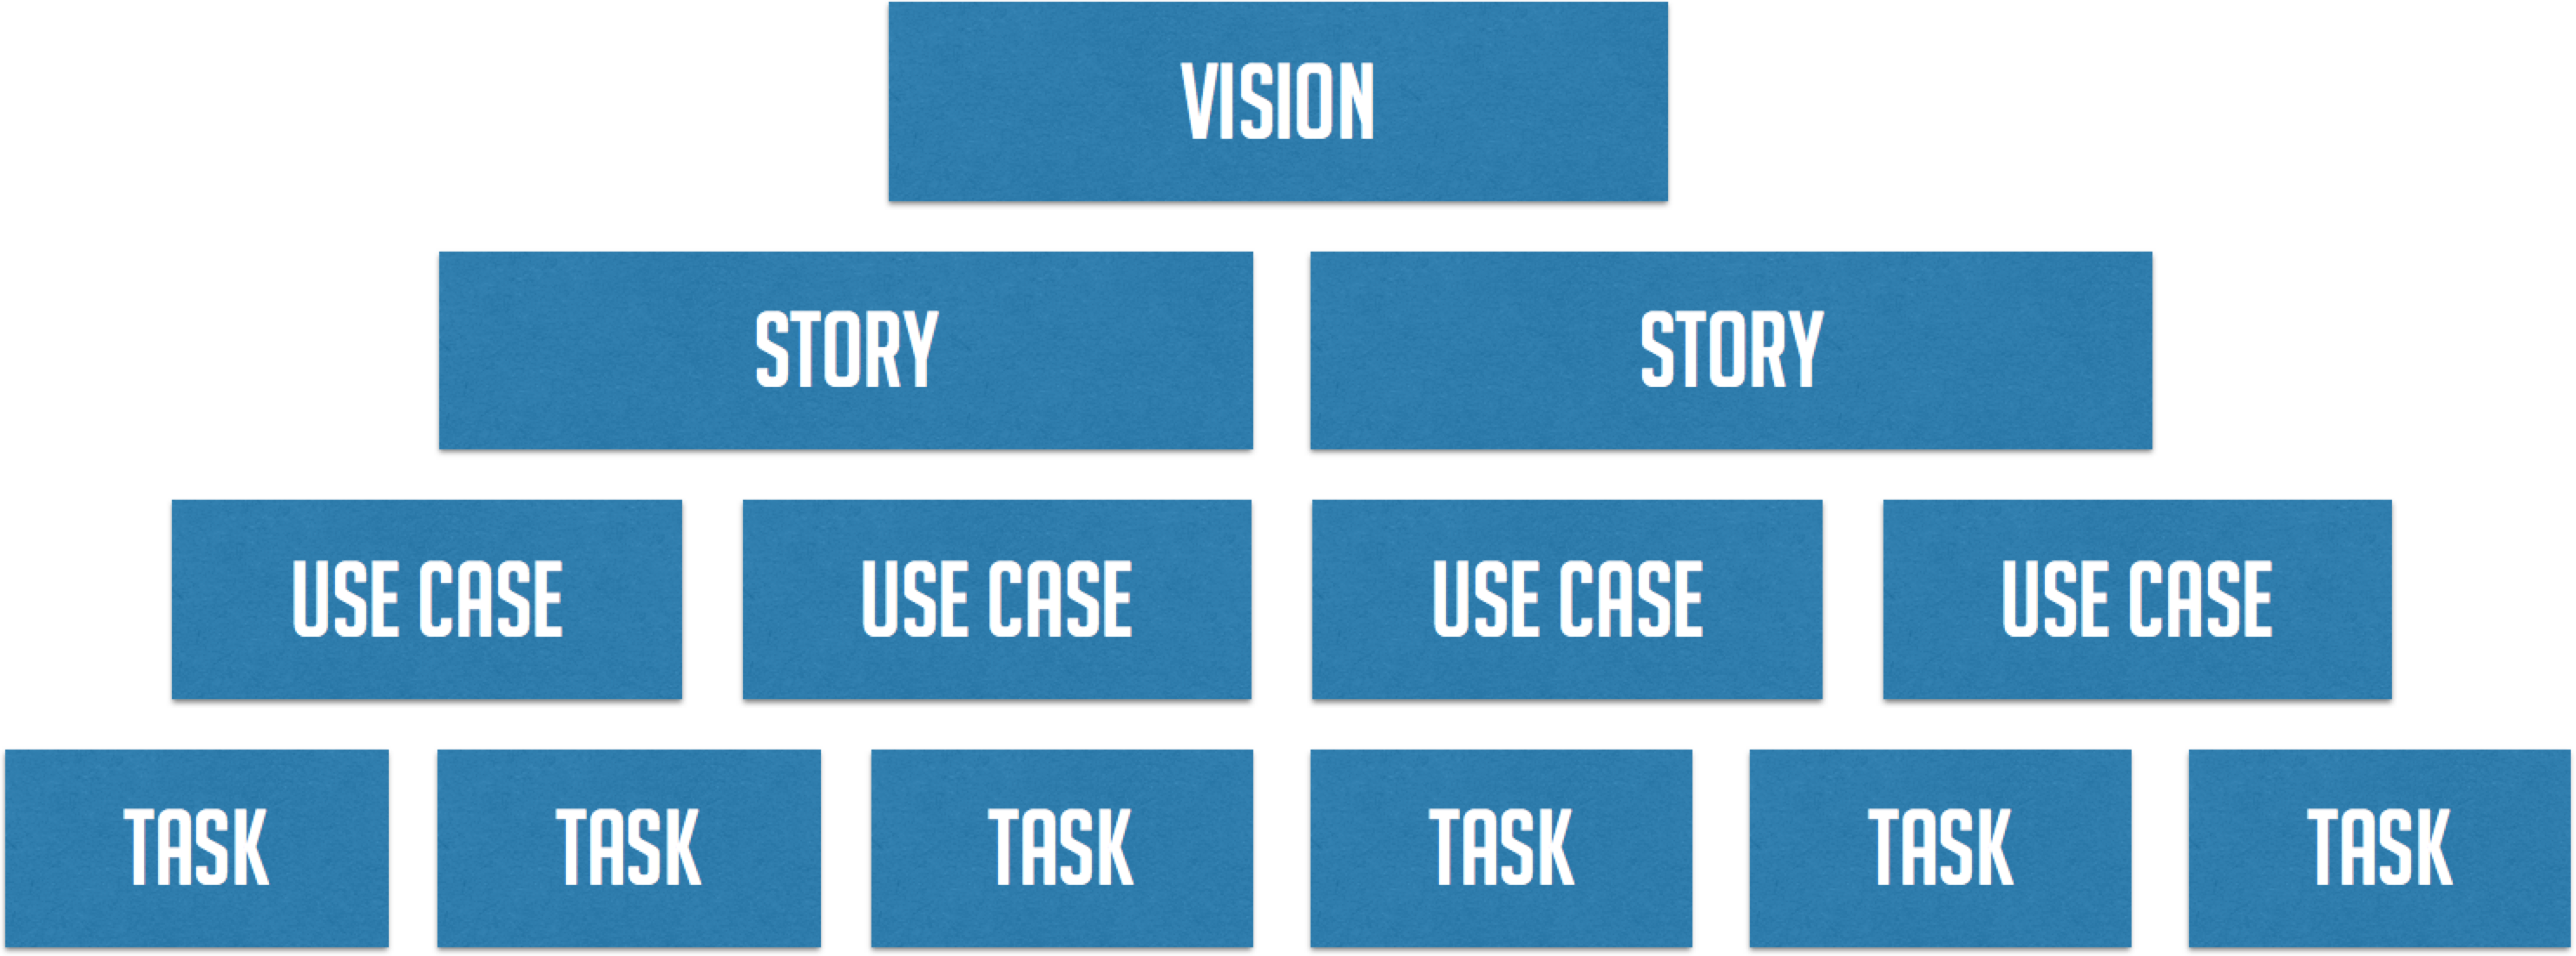
As each of the phases of the process are completed, there is concrete output that eventually results in working software. If we look at those outputs, they form a tree, from the vision of the product all the way down to tasks that will be performed to create the working product.

Cantina Process Outputs

Envision

EnvisionThe first step is Envision. Typically this happens before development begins. In this stage, we work with the client to determine the overall vision of the product using a variety of techniques like:

  • Industry research
  • Documentation review
  • Stakeholder interviews
  • Collaborative workshops

This phase is very important not only to refine what the client wants from the product, but to get everyone on the team to understand why we are building it. If we can get everyone on board, it will be much easier to maintain motivation throughout the course of the project. If we understand the vision, we can really get behind the product and feel proud of what we’ve built.

Define

DefineOnce we have the vision of the product, we can start to narrow down what the concrete goals are to be accomplished with the product. These goals are described with User Stories. The term User Story is quite overloaded in the industry, so let’s look at what Cantina means by the term.

What is a user story?

A User Story is a goal a user wants to accomplish and a rationale for why:

  • Who? The type of user using the particular feature
  • What? The goal they will accomplish with the feature
  • Why? Why do they want to accomplish this goal?

An example of a user story might be: “As an editor, I want to approve articles before they are published so that I can ensure they meet our publishing guidelines”

Notice that the story doesn’t talk about anything implementation specific. We are trying to get at the real world goals that the user has, not specific features or how they will do it. That comes later. One reason for this is it helps the client take a step back from concrete features and think of the real reasons for the product’s existence. The rationale is an important part of the story. If the client has a hard time enunciating why a user might want to do something, the story is probably a good candidate to remove from scope. Reducing scope reduces time to market and risk.

One difference between this type of story and others you may have encountered is that Cantina doesn’t have a full staff of developer/designer unicorns, and that’s OK. We will have multiple people from a variety of disciplines working on a particular story at the same time. Also, there will be multiple ways that the goal might be accomplished in the application. This will become clearer in the next phase.

Design

DesignOnce we have the goals we want to accomplish in the product, we can start to design how those goals will be accomplished and also start thinking about the technical aspects of the product.

It’s important for the design team to have a bit of a head start so that the development team can have a decent backlog to work with. During the time the design team is designing the user experience, the development team can start to determine what the minimal technical design and stack might be and start setting up the development tools and processes.

Technical Design

One of the reasons Cantina uses the term “technical design” over “technical architecture” is that architecture is a loaded term with some negative connotations in the industry. Architecture implies a lot of up front planning and careful specification. In the brick and mortar world, this makes sense, because it is often very costly to change a building once it’s built. This isn’t true for software, however, if it’s done right. If we create clear boundaries in our software where it is expected to change, and use good programming practices, we can build a system where the technical design can change and be refined as we learn more about the technical requirements.

The Last Responsible Moment

The Last Responsible Moment is a term from lean software development. It means deferring important or difficult to change decisions until it’s irresponsible to do so. Essentially, this is when the potential cost of putting off the decision becomes greater than the cost of making the decision. For us, this can be things like deciding on a particular 3rd party provider or a particular database or middleware. One way of doing this is using temporary solutions for common components. For example, using an in-memory or embedded database, or using a simple in-process messaging implementation instead of specific middleware. By putting boundaries in place at these components, we can build the rest of the system without deciding on the final, concrete implementations. Deferring these important decisions until we have all the available information allows us to avoid making risky decisions that might be very costly to change later. Though there may be a small amount of work to implement these temporary components, the amount of reduced risk may be worth it.

Stack and Development Pipeline

Determining the stack and development pipeline entails things like deciding on languages, a toolchain, and setting up source control, continuous integration, and continuous deployment. It’s essential that these things are set up before development begins, or it will continuously degrade productivity and end up putting development on hold later when the team finally gets around to it, if they do it at all. Cantina considers a full, modern development pipeline to be the bare minimum on projects. It is something we expect our clients to provide if we are using their infrastructure. At a minimum we require the following:

  • Continuous integration
  • Test runner
  • Style checking (linting)
  • Code coverage
  • Documentation generation
  • Performance analysis (optional on a per-project need)
  • Logging
  • Continuous deployment

These systems will become important later in the Delivery and Measurement phases of the process.

Use Cases

The design team can use whatever methods they find to be more effective when designing the user experience. This can be anything from Jobs to be Done, to prototyping, to user testing. What’s important is the output of this phase, which is Use Cases.

The Use Case is one of the most important outputs of the design phase, as it drives the rest of the process. A Use Case is:

  • A complete description of what will be built
  • A complete description of what will be tested
  • A complete description of what will be demoed
  • The “definition of done” for the client to sign off on

If we look at an application as a single entity, from client to server to data layer and external services, we can see that every interaction follows the same pattern:

Application inputs, outputs and side-effects

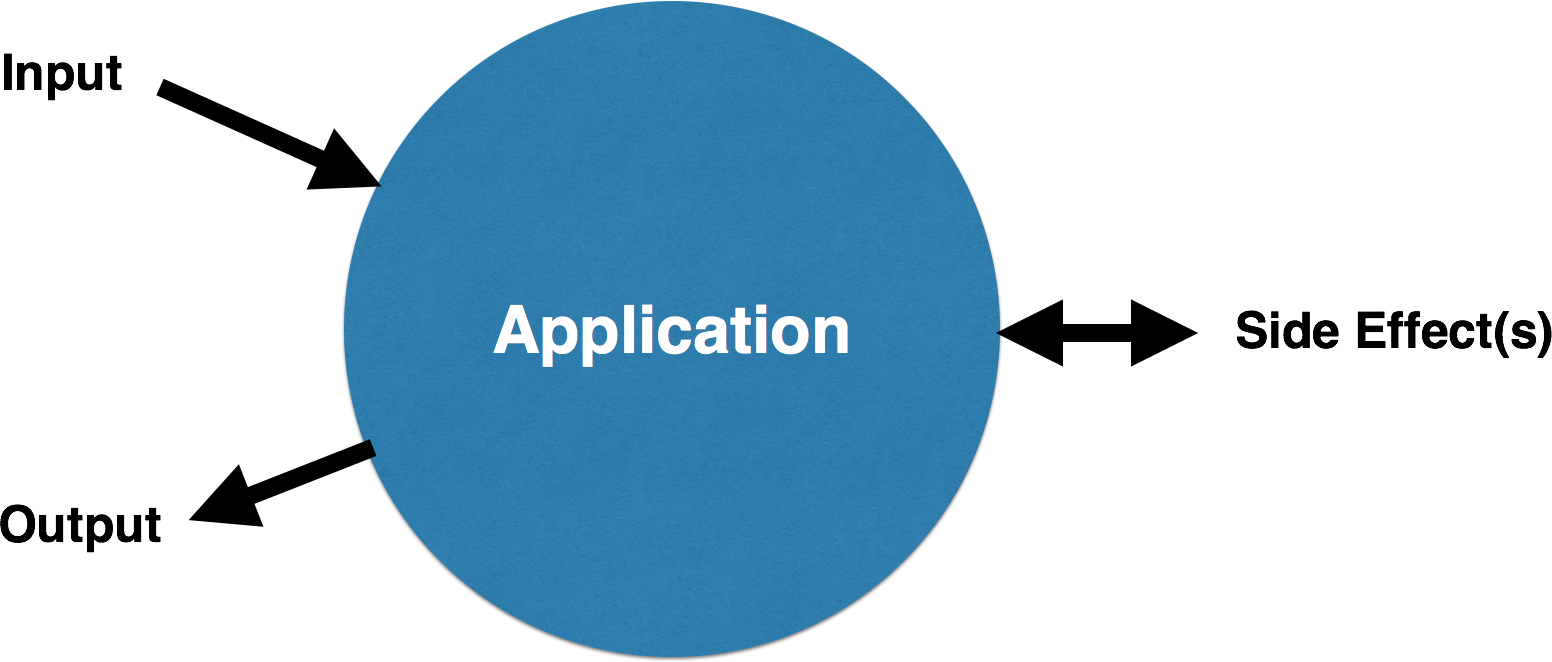
Before the interaction, we consider the application to be in a particular state. We call this the preconditions of the interaction. Next, there is some input into the application. This can be filling out a field on a form, sending request to an API, turning a knob, really anything. It’s possible that the application simply transforms this data and returns it, but more likely there are one or more side effects. Side effects are things like inserting data into a database or reading a file. Finally, there is some output from the application. This is usually some change to the user interface, but can really be any output, such as a JSON response from an API. Finally, after the interaction, the application is in a new state. We call this the postconditions of the interaction. This is a very functional view of an interaction and is often described as “design by contract”.

To review, Use Cases are interactions between the user and the application that achieves the goal of the story. They have the following components:

  • Pre-conditions: The relevant state of the application before the interaction
  • Input: The information transferred into the application from the interaction
  • Side effect(s): The side effect(s) which occur
  • Output: How the application responds to the user
  • Post-conditions: The state of the application which was affected

Example Use Case

A simple example of a formatted Use Case might be:

Pre-conditions

An account with the email “dave@cantina.co” and password “12345” exists

Steps
  • Authenticate with email “dave@cantina.co” and password “12345”
  • Navigate to account form
  • Enter “dfox@cantina.co” into email field
  • Tap “save”
  • Assert the “account updated” message appears
Post-conditions
  • The account has been updated to use the email “dfox@cantina.co”

The corresponding story for this use case might be: “As a registered user, I want to be able to change the email on my account so that I can still receive alerts if I want to use a different address”

This textual description is added to the project tracking software that the developers will use during development. Along with this description, the designers might include prototypes, storyboards, whiteboard captures, or any other assets which will help the developers build out the use case. The more clear the Use Case is, the less churn there will be between the teams and the more efficient we will be. This doesn’t mean that the designers and developers don’t communicate, however. There should always be good communication between all team members during a project. We don’t just “throw it over the fence” and hope it gets built.

Who Writes the Use Case?

This is really part of a BA role, however more often, the developers will do this as a group. They will work with the designers and look at the prototypes, whiteboard captures, etc., discuss the interactions, and write out the use cases during grooming. This ensures that the developers themselves agree that each Use Case has enough information in it to be properly implemented.

Tasks

Once the team has the Use Cases, they can start to collaboratively determine what tasks are necessary to actually build them out. Tasks are the specific, concrete work everyone will perform to actually create the application. This should be done during sprint planning as a team so that everyone can have input. The technical designer should have a good idea of the components involved but it’s important for the members with varying disciplines to weigh in. Examples of tasks are:

  • Create account_details database table
  • Write UI test
  • Stub controller method to return account details JSON
  • Create service function to update email address on account details
  • Create account details form

It’s also important here for the Technical Designer to help suggest assignments for tasks so that the work can be done in the most parallel fashion to gain the most efficiency.

Once the planning is done, the team moves into delivery.

Deliver

DeliverFor source control, Cantina has standardized on Git via GitHub and uses the full Gitflow process.

Ideally the team will have, at minimum, a staging environment, a development environment, and a test environment that are able to be automatically deployed to. These environments must be as close to identical as possible, save their configration. The CI server will run tests against the test environment. The team will use the development environment to deploy builds as the team integrates with the develop branch, and when those are deemed stable enough they can be promoted to the staging environment by merging into master. Demos to the client are done from the staging environment which should always be stable. This allows the client to interact with the application as needed and possibly to have a Q/A team involved.

Test Driven Development

Cantina uses a full test driven development methodology. Testing is extremely important in delivering quality software. Some of the reasons for testing include:

  • Proving that a Use Case works as described
  • Flagging regressions before they make it into the staging environment
  • Confident refactoring of technical debt, especially with dynamic languages like Javascript, Python, Ruby, etc.
  • Less time spent debugging
  • Testable software is generally better structured
  • Real, large, empirical studies done by Microsoft, IBM and others show that software with tests has fewer bugs. End of story.

To some, it seems like writing tests takes a lot of time away from “actual development”, however this couldn’t be further from the case. If we look at the alternatives, it’s easy to see that testing actually decreases development time. Consider the time that it takes to write a UI test for a single interaction. Let’s be conservative and say it takes a few hours. Now think of the time it takes when there is a single regression. First the bug is discovered, by manually testing the app. Then someone has to write up the steps to reproduce it. Then the developer has to stop working on new features and walk through the steps to verify the bug. Then the bug has to be fixed, merged, and deployed. Then the fix has to be verified. You can see how even with one regression, the time quickly adds up. With no test, that regression could pop up again, and we haven’t even touched on the other inefficiencies:

Testing vs. alternatives

The real question is how can we test most effectively, or spend the least amount of time writing test code while getting the most benefit.

Cantina’s Testing Strategy

Cantina’s minimal testing strategy can be summed up as the following:

  • Functional, full-system, integrated, UI-based testing of each Use Case
  • Integration tests of all external components
  • Full continuous integration to run tests regularly
  • Developers add further tests at their discretion
  • Tests are written first, then the code

UI-Based System Tests

These tests automate the interaction that the user has with the application. The tests are run against the fully integrated application on the test environment. There are no* mocks used. The test follows the steps outlined in the Use Case and validates the pre and post conditions. In addition, there are integration tests which validate that the systems which perform the side-effects work correctly.

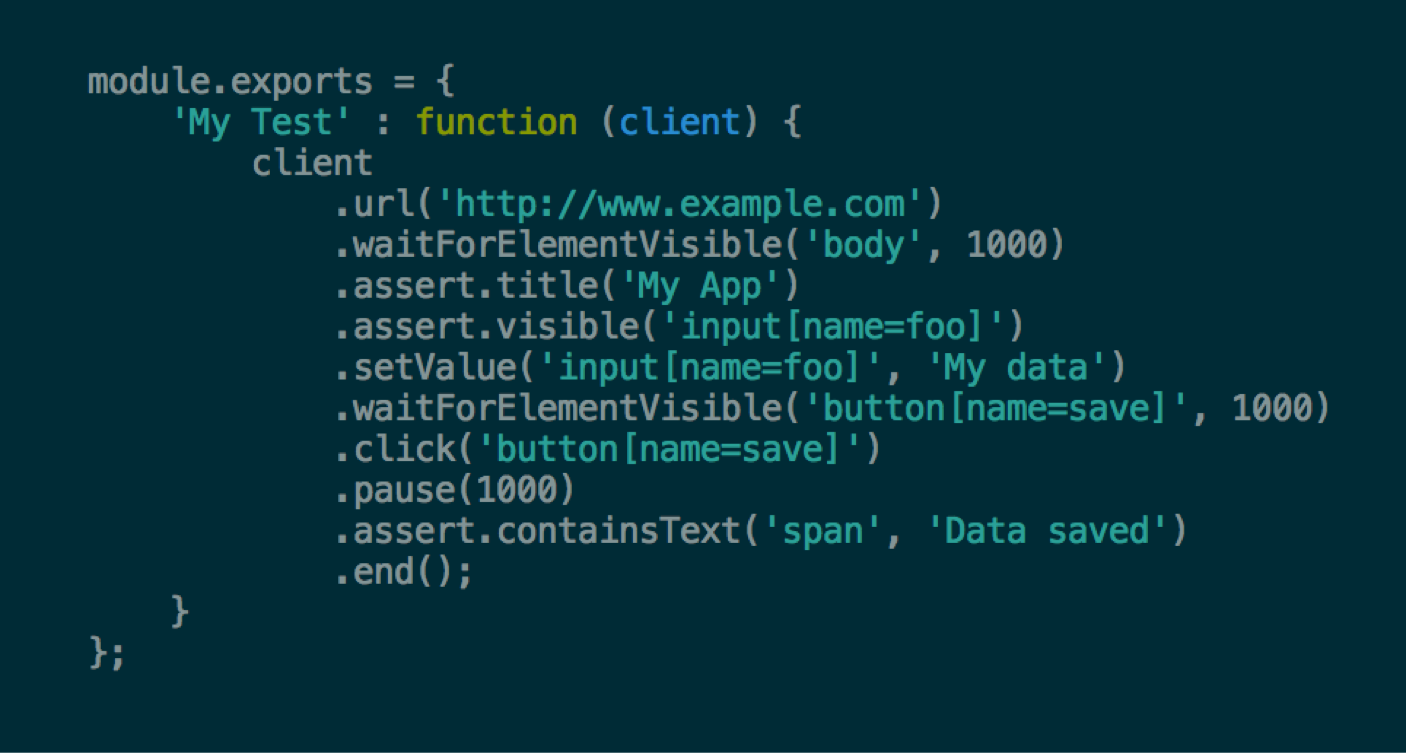
UI tests are generally very slow to run as they require the full running application to be started with all fixtures to be in place. They have also been historically considered very fragile. We will generally only run them on the continuous integration server to overcome the slowness, however the fragility of the tests is really up to the developer. Where aspects of the tests are fragile (e.g. where the test has to change often as a result of UI changes), the developer should introduce boundaries to isolate the changing code. Also, by agreeing on some common sense conventions, using named selectors instead of DOM-location-dependent ones, and by adhering to general best practices, we can alleviate much of the historic problems with these tests. Also, newer libraries such as Nightwatch help make developing these tests much easier. You can see how the Use Case can easily translate into code in this example:

Nightwatch example

* Since we are running in a staging environment, some applications will make use of 3rd party services without the ability to run in “dev mode”. In these unfortunate circumstances, the staging environment may make use of mocked, or temporary gateway components.

iOS and Android

Unfortunately, the state of UI testing on iOS and Android is a little worse off. In projects where we have attempted this kind of testing, the available tools have made it very time consuming and error prone. Hopefully in the coming months, the testing libraries will mature to a usable state, or Cantina can invest some time in developing libraries to help us do UI testing more effectively.

Integration Tests

Like User Stories, the term “integration test” is also very overloaded. At Cantina, we consider an integration test to be one that validates how the application integrates with another system, be it a database, external service, or other component. For example, let’s say we are building a gateway that talks to an external web service. Our gateway has an API in the language of our internal domain, and translates that to HTTP calls to the web service. To ensure that this gateway does that translation correctly, we write an integration test for each API method on the gateway. Preferably, we do this by interacting with the real service which hopefully has a development mode. However, sometimes we can only assert that the calls are translated correctly into HTTP requests.

Walking Skeleton

Growing Object Oriented Software Guided by TestsOnce we have a test for a Use Case, we can start writing code. How do we begin? There is a concept from the book Growing Object Oriented Software, Guided by Tests that provides an answer. It’s called the Walking Skeleton.

Essentially, what we do is decide on a “sketch” of the components involved in the Use Case interaction. The Technical Designer is essential here as they are aware of the overall design of the system and can help the developers determine the boundaries between the components and their APIs.

The developers then set about writing the components, but only as stubs. The developers will agree on the API conventions and make the appropriate calls with hard-coded return values to make the test pass as soon as possible. You can think of this as “fake it until you make it”. This ensures the component APIs are well defined and integration happens up front, before any other work is done. Once the components are integrated, the developers can work on the code independently knowing that then they merge their branches together, everything should “just work”. Although there will always be some issues with integration, this technique saves a lot of time and helps developers communicate better. So how does this play out in practice?

Walking Skeleton example

Let’s say you have 3 developers working on a Single Page Application with an API. One developer is working on the on the Javascript client, one on the HTTP API and service layer written in Java, and one on the data layer for the server, also written in Java. There are natural boundaries at the HTTP layer and at the data layer. There will be more inside the larger components, but for the purposes of the walking skeleton, we can concentrate on those.

If the JavaScript client developer and the API developer agree on the format of the request and the response, and stub those out, then the client and server will be integrated. There is no need to write down the JSON format on a wiki or some other documentation medium, just return a hard-coded response from the API. The code is the documentation. The developer working on the data layer can do the same thing, returning hard-coded objects to the service layer. The developers work together in the beginning until the components are integrated and the UI test passes. This work is then committed to a feature branch for the Use Case. Next, the developers can copy their own branches from that branch and work independently. When they are each done, they can merge into the feature branch.

The developer writing the client will write the UI test, knowing the UI components needed and how to access them most effectively. The server developer will write assertions for the side effects that occur, for example, in the database. We’ll discuss how to do that next.

Asserting Side Effects

One issue with traditional UI testing or “black box” testing is that a developer must implement both the read and the write side of an interaction in order to validate that the state of the application was updated. This means that there can be less incremental development as we must implement both sides before the test will pass. Also, it is sometimes not possible to validate the features of an application simply by exercising its UI. There is one testing strategy that can overcome these obstacles. Consider the following diagram:

Asserting side effects

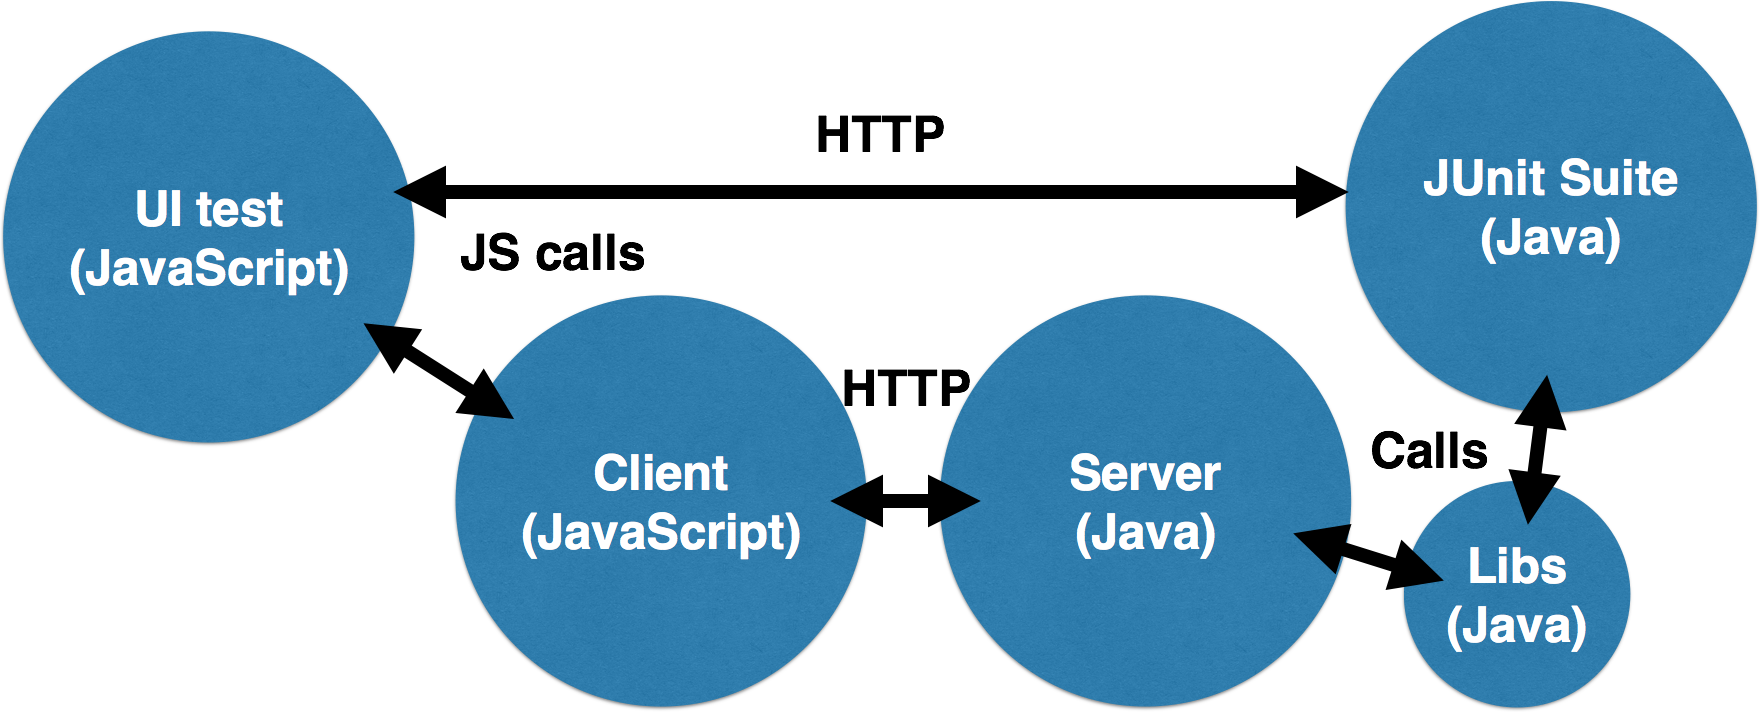
Let’s say that we are implementing a form that saves some data to a database. The UI test fills in the form and submits it using its headless browser. The JavaScript client then sends an HTTP request to the server which calls some Java libraries to save the data. How can the UI test code running in the headless browser assert that the information was saved? We can’t connect directly to the database from the browser (this is possible in some cases, but let’s say we can’t), and we wouldn’t want to re-implement the data access code again in JavaScript.

One way of accomplishing this is to write our database validation code in Java using something like JUnit. We then expose those tests to the UI test code via a simple HTTP API. The UI test code can then make a simple HTTP request to that API to execute the validation code. The JUnit suite can reuse the data layer code to perform the validation. Since the data layer code will have been tested via its own integration test, we can ensure the application functions correctly.

There is an aspect of “testing by inference” here since the data layer code is being reused in the test. However, it drastically reduces the amount of test code that needs to be written, and allows us to change the implementation of the data layer without changing our test code. These advantages outweigh the possibility of missed coverage.

Refactoring

Refactoring and Clean CodeOnce the code has been written for the Use Case and the tests are all passing, the developers can take some time to refactor their code. We must make a distinction here between rewriting and refactoring.

Refactoring is improving the structure of existing code without changing its functionality. The only way to do this is to have tests which validate the functionality of the code. Otherwise there is no way to tell if the functionality has been altered. The books Refactoring and Clean Code have some very helpful techniques for identifying “code smells” or common code issues and resolving them through careful application of refactoring patterns. You should read these books to really understand what refactoring is and how to do it effectively.

Measure

MeasureFinally, we can use our toolchain to help measure the quality of our code. The tools that we built into our development pipeline, such as code coverage, style checking, static analysis, and others can give us a good indication of our code quality.

Frequently Asked Questions

What if the client wants to use their own process?

Then we will use their process. This is most often true of Core Team projects. However, if we can make any suggestions about how to improve the client’s process, given experience with our own, then we should. Also, we are being hired as experts and our opinions matter. We should strive to be good consultants and try to help the client wherever we can.

What if I don’t know how to write testable code?

Your colleagues are here to help you! Ask someone with some more experience with TDD than you to help you. We all have different skillsets and we should learn from one another. Also, there are lots of different techniques for writing testable code that you can find online or in books.

Etc...

Speaking at Conferences

We’re encouraged to share our knowledge with others, and this includes speaking at conferences. During projects, you’ll often encounter problems that you’ve solved and this provides a great starting place for your talk. You have knowledge that other people can benefit from, don’t be afraid to share it!

How to Create a Talk

It’s often easier to write a talk by starting backwards. Think of 1 to 3 things that you’d like an audience to learn and use these as your talk takeaways. Create a 3 to 4 sentence abstract (typically 300 words or less), that discusses what your talk is about, why it is relevant, and what an attendee will learn. The more descriptive your abstract is, the greater chance of it being accepted.

You’ll also want to have a bio and a headshot photo (You can use your Cantina bio and photo). You’ll want to have access to a photo you can upload and one you can link to, as conferences may have a submission for either option. You can get a public Dropbox URL for your Cantina headshot.

Some conferences will ask for past slides or video of past talks. If you don’t have any experience, don’t worry – sign up for a lighting talk and record it. Post this to YouTube for reference, along with your slides. We have internal lighting talks at Cantina, so we may be able to record one of those for you.

Store all of this content in a Google Drive file, so it’s easier to reference and will make submitting your talk easier. As you submit talks, and conferences ask for additional content – store copies of this in that same Drive file for future reference.

If you’d like to practice your talk prior to an event, you can setup a Lunch and Learn with fellow employees.

How to Submit a Talk

Find a talk that seems relevant and interesting, and submit your talk. You can find conferences looking for CFPs in #conferences-training on Slack, through resources listed below, from Twitter, or a Google search. It’s recommended to submit to as many conferences as you can, and when accepted, you can pick which ones you’re able to speak at.

You’ve been Accepted, Now What?

Talk with your PM about the dates, to ensure you can make the conference based on your current project’s needs. Then forward the acceptance email to Gail, so you can begin to setup travel accommodations.

Marketing

Once you’re posted to the conference site as a speaker, contact @clark to create a speaking event for the Cantina website. The event will have the date, time, title and abstract of the talk; along with a link to the conference site.

After the event, write a recap of speaking at the event. You can write about your Q&A session, other sessions that you saw, other companies that were invited to speak, and anything else you’d like to share about the conference. You can also talk about your personal experiences more in depth, in #conferences-training.

Slack Conference Channel

We’re constantly sharing conferences that are looking for speakers in Slack, so join #conferences-training.

Resources

  • WeeklyCFP – a weekly newsletter with CFP from conferences around the world
  • Technically Speaking – a newsletter with tips and tricks for speaking
  • Lanyrd – a directory of conferences, of various industries, around the world.

Community Involvement

At Cantina, we are encouraged to use our skills to help advance the causes that we are passionate about both as a company and as individuals. Luckily, in Boston and the surrounding areas, there is no shortage of opportunities to give back to the community. Some activities involve just showing up and lending a hand, while others will take some prep work. This is a great use of investment time. Once you have identified an activity that you are interested in participating in, send your mentor a Slack message or email to chat about it. If you think it is an activity that your coworkers would be interested in, let them know about it too.

Here are some activities your coworkers have been involved in:

TODO: Add more volunteering opportunities

Cantina Values

  • Be humble
  • Ask questions
  • Listen carefully
  • Experiment often
  • Demonstrate knowledge
  • Help others
  • Fight mediocrity

How we use Slack

Slack is a messaging app that we use to communicate with each other. Slack is the priority communication method, and should be used over email whenever applicable.

Slack prioritizes quick, instant, visible, transparent conversation. Having conversations in the open does take some getting used to, but is encouraged over having several direct messages. Gifs, puns, and other LOL material are highly encouraged.

Internal Channels

We have several internal Cantina channels, where various topics are discussed. On your first day, ensure you join #work and #not-work, as they are the two most popular channels.

If a new topic arises, feel free to create a new channel.

Project Channels

Each project should have it’s own Slack channel within the Cantina team.

Any important/relevant information for the project should be pinned to the channel. This helps recall of information, and decreases onboarding time of any new project teammates. This could include URLs, wiki content/links, contact information, names, documents, schedules, etc.

Some projects will do their standup in Slack, removing the need for an additional phone call to your schedule.

These channels are Cantina internal only.

Client Teams

If a client uses Slack, they may invite Cantina to their team. Cantina doesn’t create Slack channels for clients. If invited to a Client’s team, there would still be an internal project channel in Cantina’s Slack team.

Slack Bots

Install any bots that will help increase efficiency and transparency. Some of these may include: Github, Harvest, Dropbox, Invision, etc.

Onboarding with Dolores Landingham

We have the pleasure of onboarding new employees with the 18F bot, Dolores Landingham. For the first 30 days, a new employee will receive a message from Dolores, giving important information about working at Cantina.

Tools and Experimentation

The specific tools, frameworks, technology and libraries we use for each project will change, based on the project and client’s needs.

We are encouraged to try new technology so we can constantly be learning and improving. Some of this will be learned during projects or during bench time between projects. Clients hire us because we’re the best and are at the front line of emerging technology; so we should all strive to constantly be learning.

After learning new tools, frameworks, technology and libraries; you should create and schedule a Lunch and Learn talk, to share with the rest of Cantina. This helps us all increase our T-shaped skills. It also gives us a better understanding of when this technology should be used in future projects.

If you’re interested in a specific tool, framework or library; start investigating it!

Prototypes

Prototypes are used to quickly test ideas/features, show interactions, and demonstrate patterns. Prototypes can vary from simple pen and paper prototypes to advanced prototypes in Invision or Atomic showing animations, interactions and workflows. We can also use plain old HTML/CSS/JS for our prototypes (just be cautious these don’t get put into production).

Prototypes are helpful to show workflows, element states, animations, interactions and other patterns. Prototypes can be a great tool to use with client developers to aid in their understanding of how the production application should work.

The goal of the prototype will determine it’s level of fidelity. Prototypes can be done quickly on pieces of paper or they may need to be higher fidelity and included as a deliverable or in knowledge transfer.

Your prototype tool selection will depend on the fidelity and purpose of the prototype. For example, InVision is typically better for flow (or screen-to-screen) prototypes, where a tool like Origami is good for detailed interaction design. These both have valid use cases, and projects should use them on a case by case basis.

Prototypes are used to inform how the product will look and behave. It has not been designed with production needs in mind, such as: scalability, maintainability, failure prevention, deployment, etc. Often, a prototype will be lacking major pieces of functionality that weren’t necessary during the research. Do not use a prototype for or in production. Do yourself a favor and start your production product anew.

Tools

Remote/Offsite

Due to the nature of our work, rarely is everyone in the office at the same time. Some folks are at clients, some are working from home, and others work remotely from various parts of the country. This encourages us to work with a remote first mindset. Meetings should always have a corresponding Google Hangout or Uber Conference running. Conversations are best done in Slack and when they in person, the outcomes should be recorded in Slack.

If a meeting has more than 2 people in the office, someone should record/transcribe the meeting in a Slack message for all attendees. This helps alleviate any audio issues, and reduces folks having to repeat conversation.

When you’re working offsite, over communication is key. Sharing all relevant knowledge and asking any questions quickly is imperative, so we can all stay informed, which helps keep projects running smoothly. Talking openly in the project channels is encouraged by everyone.

If you’re stuck on a technical issue, use Screenhero to share your screen with a coworker.

Projects may require various working locations; at the office, onsite at the clients, or working from home. If your project’s location can change daily, you should inform your team where you’ll be either at the start of the week or start of the day; depending on the project’s conventions.

How to Write for the Blog

So you want to write for the Cantina blog? That’s great!

We believe that everyone has something to teach. This guide will walk you through how to get started and make your post ready for prime-time.

Why writing for the blog is important?

Here are some benefits the blog impacts:

  • Content from our blog is used in our newsletter to keep people informed
  • Builds awareness for the Cantina brand
  • Reach more buyers and customers at lower costs

Think of a topic

If you already have a topic ready, you can skip to the next section. If you need help coming up with a topic to write about, here are some great suggestions to get the mind thinking:

  • What are you currently working on and what about it is interesting?
  • Are you learning something new and want to write about your experience?
  • Did you recently attend an event or conference?

Pro-Tip:

Posts are designed to improve the reader’s skills or understanding of a topic. Your topic should demonstrate leadership by providing something new and different into the conversation.

Understand your audience

We tend to write blog posts that match with the three solutions Cantina offers to customers: Mobile Product Development, Responsive Design & Development, and Enterprise Grade Technical Design.

Provided below are descriptions of each:

Mobile Product Development is the solution for businesses seeking innovative ways to reach their mobile customers. Through research and iteration, we hone in on customer needs to design, build, and deliver the right product to the right audience. At the end of an engagement, clients are able to launch and measure the success of their product.

Responsive Design & Development creates reusable, extensible, and device agnostic design systems for our clients. It starts with research, and continues through to the implementation of design patterns within a client’s projects following Cantina’s overall design process and philosophy.

Enterprise Grade Technical Design produces highest quality, scalable technical solutions without over-engineering. It is helping clients maximize their capabilities through refinement of technical focus and processes. It spans architecture, implementation, deployment and operations. Our mission is to provide clients a technical foundation on which innovation can take place.

Start by thinking about the person who fits within one of these solutions - the role, challenges, and existing knowledge-base they might have.

Write

Now that you have a topic and given some thought to who will be your reader, it’s time to start writing. Here are a few guidelines to follow to help keep our writing clear and consistent:

Casual, but smart - No one wants to read something that sounds like a term paper. Think about how would you talk about what you’re writing if you had to do it person.

Specific; get to the point - Get to the important stuff in the first paragraph, and don’t bury the lead. Good blog posts are scannable and easy to digest. Great blog posts have short paragraphs of three or four sentences with subheads. Keep in mind that our readers are busy.

Link it up - Feel comfortable linking to other websites if it helps explain something.

Make them smile - Cantina is a fun place to work and we want our blog to reflect this. Add a joke, or link to a funny video when appropriate. If we can be the best part of someone’s day then we’re doing something right. Just don’t overdo it.

Voice and Tone:

  • Fun but not silly
  • Confident but not cocky
  • Smart but not bossy
  • Helpful but not overbearing

Create a hierarchy of information - Lead with the main point or goal. Support it with later paragraphs or sections.

Use active voice - the subject of the sentence does the action, Words like “was” and “by” may indicate that you’re writing with a passive voice. Check for these words and rework sentences where they appear. Even better, use Hemingway App and it will find them for you!

Use pictures - Include images in your blog post to help illustrate your point. If you’re explaining how a feature works, include a screenshot. Make sure to remove image links and use alt text.

Pro-Tip:

Start boldly; intrigue the reader in about 50 words.

Image Formatting and Preparation

There are a number of different image formats suitable for use on the web. Choosing the right one is key for balancing quality and page load times. Here is a rough guide to the formats and the benefits of each:

JPG

  • Best option for photographs
  • Great for images when you need to keep the size small

PNG

  • Good for logos and other non-square images
  • Support transparency in PNG-24 format

GIF

  • Good for line art
  • Support transparency
  • Can be animated

When you are preparing images for a blog post, there are a few steps you can take to ensure the best results.

  1. Consider the physical size of the image(s) you want to use in your posts and crop accordingly. For instance, the preview image on the /blog page is square and takes up 25% of the page width. Cropping a non-square 6000px x 4000px image will save load time and will not sacrifice image quality.
  2. Use Photoshop’s built in export tools (File -> Export -> Export As). Photoshop will allow you to tweak the quality settings and will produce a smaller file size than just saving the image normally.
  3. Download the ImageOptim tool, open it, and drag exported images into it. This tool will remove extra data from your files making the image size even smaller without degrading the quality.

Review, publish, and promote

When you feel like your post is in a good place, it needs to be peer reviewed by someone who has experience in the topic you are writing. We encourage that you have more than one person look it over. Update the post based on the feedback and send over a link to a Google doc to Clark (clark@cantina.co) in Marketing. Please make sure the permission is set to “edit”. He will also review it and provide final feedback.

Last thing you need to do is write a 20 word or less brief description - this goes on the blog parent page under the hero image. Marketing will handle getting the blog post coded and will send you a link for one last look. If everything is good, we will publish it to the website and promote it over social media. As I write this, we post to the blog every Wednesday.

Futher Reading: